F'n Drama!
OK so clearly this is NOT a tutorial on how to look like Johnny "Drama" Chase from Entourage. But, whenever I hear someone talk about "drama" I cant help but yell out "VICTORY!!!!!" Sometimes...there are good kinds of drama. I swear! You know, like the kind of dramatic makeup looks that would stop traffic, or just the kinds that will make people sit up and notice you. Definitely not for the feint of heart...but a nice way to shake up your regular makeup routine.
So everyone can do a light to dark eyeshadow progression right? I mean, its pretty common nowadyas to do the light on the lid, dark in the crease/outer corner. The dark goes on the outer corner/crease to add depth and drama right? Welllll what if we switched it around? I had been DYING to try this look and make it work so it didnt just look like my eyes were on backwards. First thing I did was of COURSE grab my Madd Style Cosmetix pigments!
So I took a look at my extensive collection of MSC eye pigments and tried to pick a color that I had a lot of. Clearly the most colors I have are purples and pinks (my own preference)...but wanted to do a different look. I chose GREEN cuz I had a great selection of darks and lights. I started swatching the colors on my arm and then lining up the piggie pots in order from dark to light. I highly recommend swatching your colors on your arm before you decide to use them...it really does help! So I ended up picking six....yes SIX lovely green MSC eye pigments and here they are:
 OK Left to right the lucky winnas are:Dark Crystal Emerald, Misfits and Moonbeams, Soylent Green, Weird Science, Acid Bath & Pieces
 Next thing we're going to do is get those eyes prepped. Time to prime and base. Refer to my tutorial on priming and basing on Youtube natch. Link here: Primers & Base Tut! To really help these colors pop we are going to put two different color bases on. The first color is going to be the NYX Jumbo Eye pencil in "Black Bean" on the inner corner of the eye blending slightly outward towards the middle of the lid. Then, picking up around the center of the lid and blending outwards to the outer corner, NYX Jumbo Eye Pencil in "Milk". To get a nice sharp line, we will do the old tape trick only er...I seem to have run out of tape. Looks like it's time to improvise....
Forget diamonds...Post-It Notes are apparently a girl's best friend!!!
So in the above pic you can see how I blended the two base colors and used my handy dandy post-it note to get that nice sharp line later.
Now it's time to start with the good stuff. Get your small shadow brush and dig on into your darkest color which is Misfits & Moonbeams!
Inner corner only for now! Don't venture too far over. This process is going to be repeated over and over. You'll get the gist.
Using the same smaller brush (clean it off if your're all hoity toity about it) and get your next to darkest color which is the Dark Crystal Emerald color:
Right next to the Misfits & Moonbeams, start laying down the Emerald in a straight line starting at the lashline and working your way up but not TOO far up. Don't go above your natural crease.
OK, so if we've done this right, by the time we reach for our lighter greens we have used up all the black base with the darker greens and are now venturing into the white based part of the lid. Still using a small brush, let's use the Soylent Green. Mmmm nommy people.
Last, but certainly not least; is Pieces. Let's hope we have enough room to get Pieces in because he is not to be missed. Pieces is going in the outer corner of this lovely striped concoction.
Time for blendy blendy with the fluffy fluffy brush! Get your naked (no color) fluffy brush and gentle-up those colors because they are pretty bold. Sweeping the brush back and forth over the orbital bone, swirl the brush a bit to soften the colors and combine all of them onto the oribital bone.
Once blendy blendy is done, get your highlight brush and any neutral toned shadow to sweep on your browbone. Then, peel off the post-it note to reveal that nice sharp shadow line!
Ah the magic of modern technology!
Lastly, line your eyes with a black eyeliner, I chose my go-to liquid eyeliner in black and then a black pencil eyeliner on the lower waterline. I just find the pencil stays longer if you scrub it into the lashline on the waterline a bit. To finish the whole look, let's grab our small shadow brush again and fill in the lower lid with some Acid Bath, because that color is just SO fab!!! I also think it lightens up the look a bit.
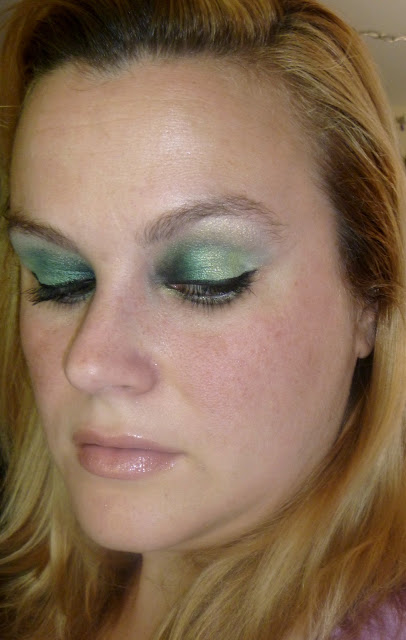
Voila! Done! A seriously dramatic eye look that really looks awesome no matter what color you use. In fact, the more dark to light colors you have to strip onto your lid the better! It will make for a complicated makeup look that will wow your friends and make you look awesome of course. Of course because I'm so humble (its my best feature!) here are some super awesome finished look pics of me me me!
Thanks for checking me out yet again my lovelies! I hope you got some interesting information from this little tutorial, I always try to be innovative and interesting! Til next time! xoxoxoxo


Fun!!
ReplyDeletebeautiful!
ReplyDelete