Total Pageviews

Thursday, May 26, 2011

Teal Ribbon Fund Makeup inspiration!!! :)

Teal Ribbon Fund - Makeup by Madd Style Cosmetix!


Howdy people! I'm back to help support a VERY important cause, the Teal Ribbon Fund.  The TRF was established by the Glitter Bitches in March 2011 to help our friend and fellow member Kim Mayhew of Ant Farm Studio, a full-time working artist as she battles uterine cancer without insurance coverage. If you don't know Kim, she is an awesome person who is always giving to her friends and fellow artists. She has given so much to the art community that we are PROUD to make a few pieces to help her out where we can. Many people have donated their handmade items and cash to help out too! To purchase Kim's art, please visit her shop at http://antfarmstudio.artfire.com/ or find her fan page by searching "Ant Farm Studio" (the full name is Ant Farm Studio - Home of The Ant Farm Gang and Loco Folko folk art).

I was super excited to re-create one of my FAVORITE eye makeup looks for the TRF tutorial! Before we get to the tutorial though, please please PLEASE check out these links to help Kim out!!!
http://glitter-bitches.blogspot.com/p/teal-ribbon-fund.html
May funding update: http://glitter-bitches.blogspot.com/2011/05/were-almost-half-way-there.htmlDonate
stuff: http://glitter-bitches.blogspot.com/p/handmade-donations.html
Donate cash http://glitter-bitches.blogspot.com/ - link on the "DONATE" ribbon under the glitterometer
Glitter Bitches Facebook page  http://www.facebook.com/gbhandmade

OK! Now sit back, relax and enjoy the tutorial!! Or....go grab your teal eyeshadows and brushes and join in the craziness!

Here are the tools you will need!

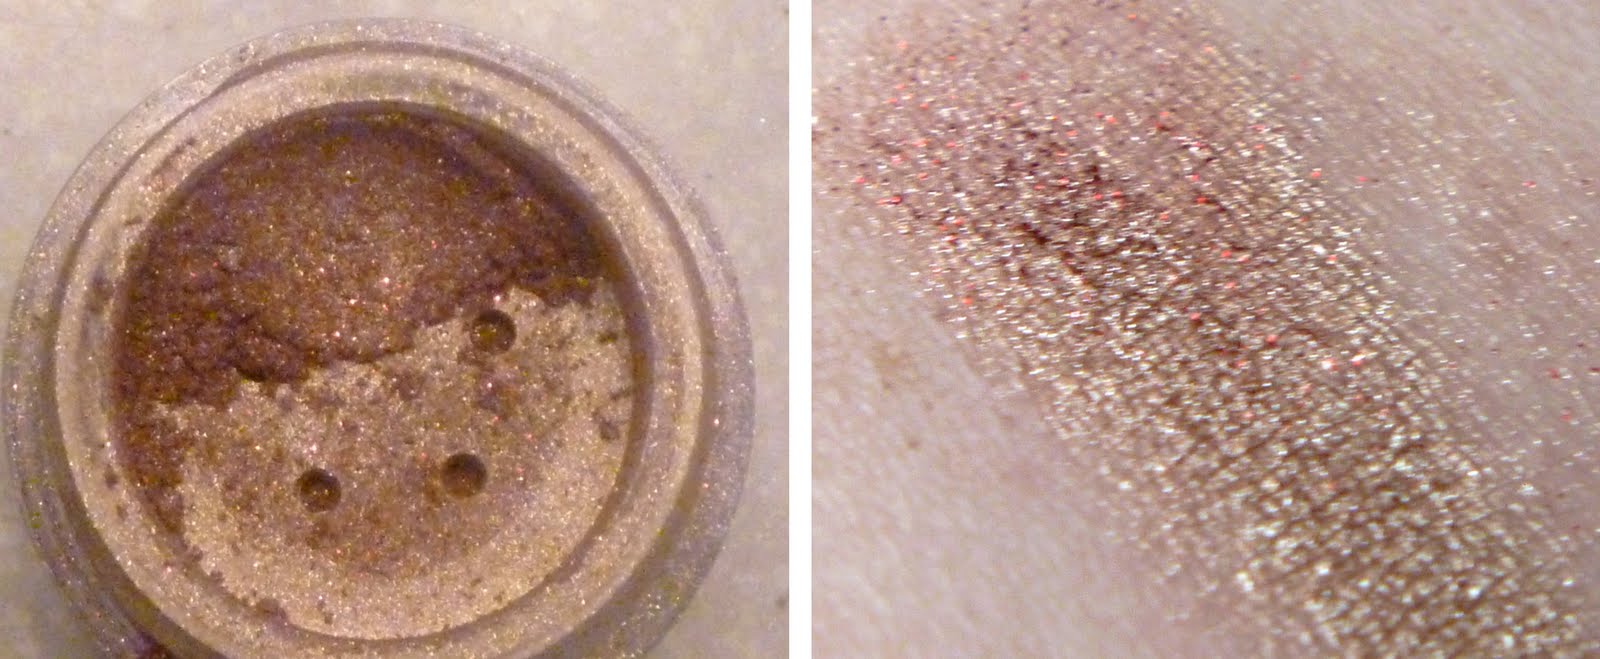
Madd Style Cosmetix (of course! Check out their new logo on the top YEAHHHHH!!!!) From top left: "Ripple" - a light blue/green color, "Nirvana" - the AWESOME teal inspiration color I chose!, "Sparkle Motion" - just the most sparkly stuff EVAH!, "Star Gazer" - a white duochrome with blue/purple interference, "Dr. Rockso" - a pearly white with rainbow glitter.
Next up, brushes!


Scotch Tape. Yes, again.


We're going to start with primed eyes, as always I'm using Urban Decay Primer Potion. Just a little bit rubbed all over the eye and let dry for 5-10 minutes. The longer the better! Next the base which is NYX Jumbo Eye Pencil in "Milk". A little goes a long way here as well, the more you use the more your chance of creasing.  (Check out my first tutorial that I posted, I have all kinds of info on primer/bases or go to my youtube channel and watch my tutorial on primers and bases its very informative! Primers & Bases Tutorial!)


Time to tape off your eyes! Get about an inch or two of tape and stick it to your face like so:


Lets start off with a small shadow brush! Grab it and dig right into "Star Gazer". We're going to be applying "Star Gazer" in the duct area and blending out lightly. "Star Gazer" goes GREAT with any blue/purple look youre doing because it has th sweet blue/purple duochrome interference stuff. Definitely a versatile addition to your makeup stash!


Once you've got "Star Gazer" on, grab a medium sized shadow brush and get some of that "Ripple" for the lid. Pat "Ripple" on about 3/4 of your lid. Let's leave the outer corner empty for now...but don't worry, it will soon have awesome things happening there! "Ripple" is a light color, so if you want to go more dramatic you can layer the color to build it up and make it bolder.


Done building your beautiful "Ripple" up? Great, now get your rounded crease brush and dip into that "Nirvana", the star of our show! "Nirvana" is going on the outer corner and getting blended gently into your crease. You can go as high up as you want if you want to be more dramatic with the color...just remember to leave room abouve "Nirvana" for your highlight color on the brow bone!


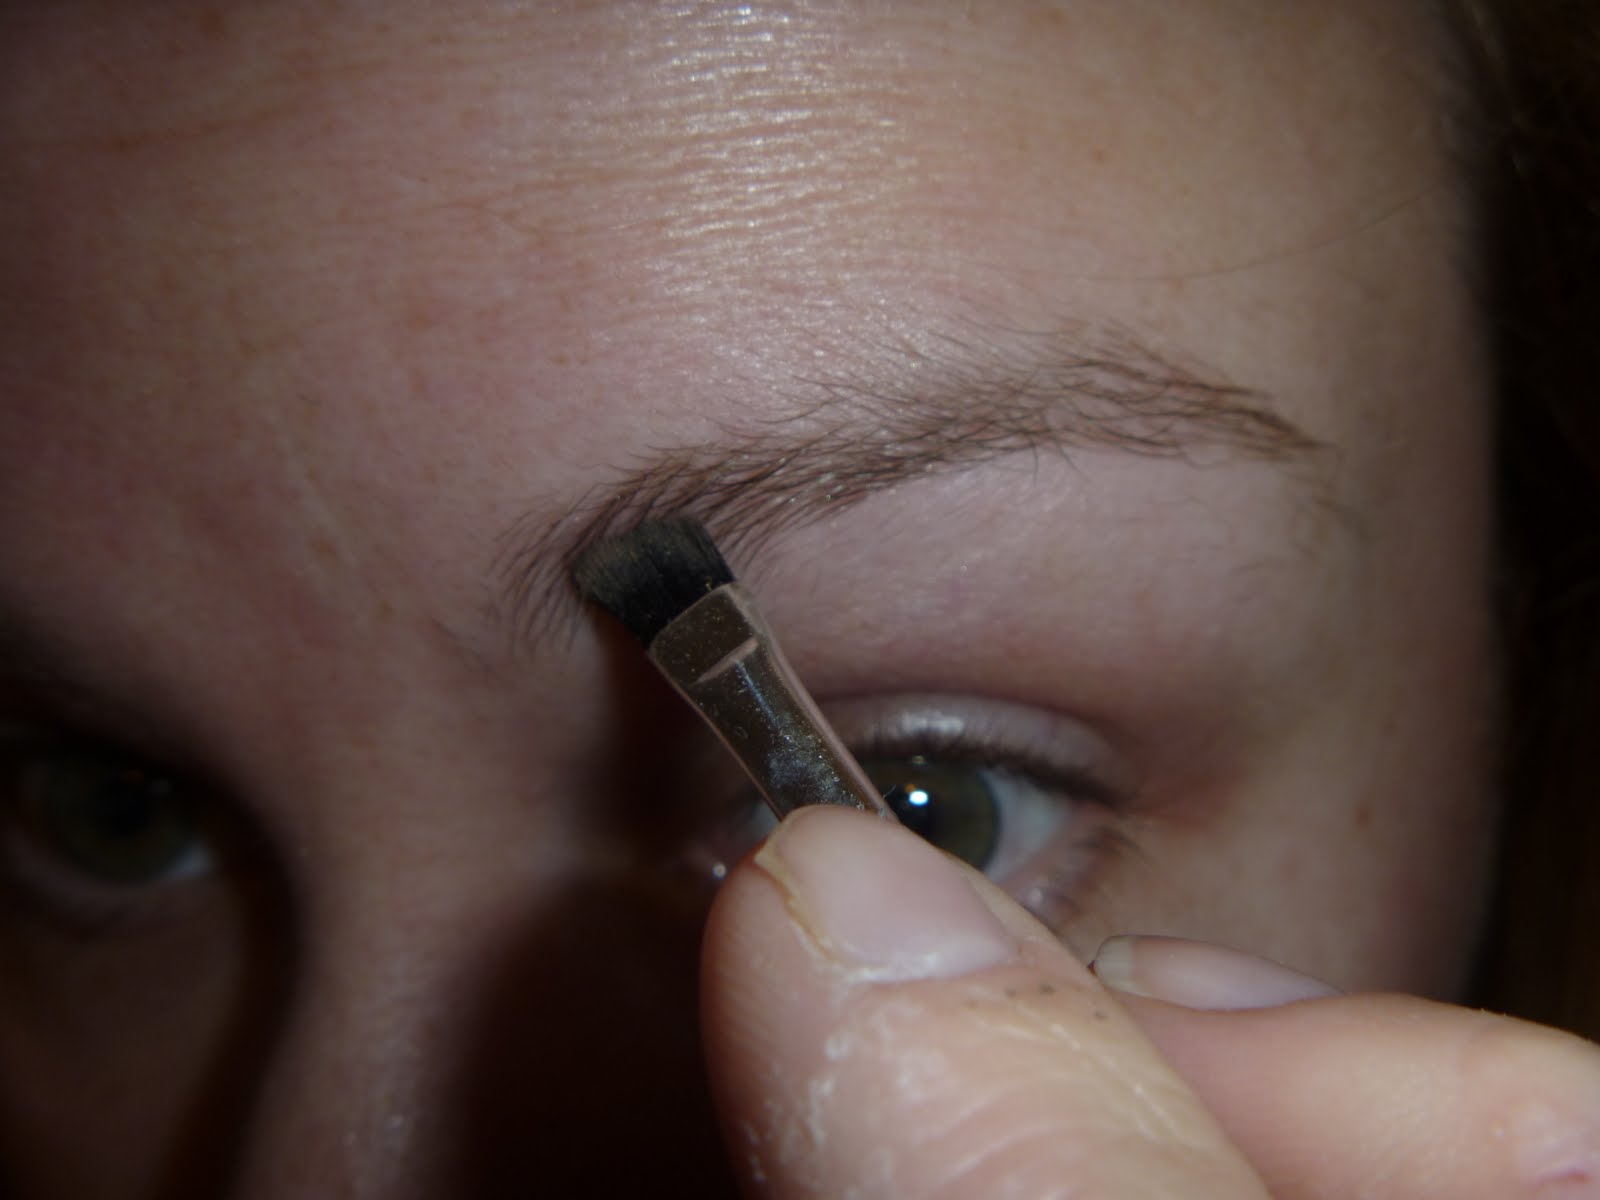
Next up is our highlight! Get your highlight brush and load it up with "Dr. Rockso" and sweep that just under your eyebrow on the brow bone. This is really going to draw attention to the high point of your eye, the brow bone.


Time for my favorite part! Blendy blendy!! Get a clean large blending brush, or any large brush that you feel comfy blending with. As long as there is NO makeup on it!


Using your large brush, blend blend blend! The hard line of your "Nirvana" will soften out nicely. Add more "Dr. Rockso" if needed. I dare you!

At this point, take off the tape! Look at that nice sharp line it created!! Gotta love tape!


Once the tape is off, grab your smudger brush or any small eyeshadow brush and fill in your bottom lid. Repeat the colors on the bottom lid as you did on top..."Ripple" towards the inner corner meeting up with "Nirvana" towards the outer corner. At this point, you can go outside the outer corner and hook up with the upper "Nirvana". I chose to keep the lines pretty clean and kept it just on the lower lid.

Mascara...Black liner on the top lid, and a little black pencil on my waterline and Voila!

GORGEOUS teal sparkly-ness and all for a GREAT cause!!!!!!  This look is pretty bold, and would be fabulous for a night look! If you really want to rock this during the day you sure can (I did and got TONS of compliments!!) but since Madd Style Cosmetix mineral makeup is so blendable and buildable, you could keep this much lighter.


As always, here for your viewing pleasure are tons of pics of ME and my eyeballs!


Is the Mailman here with my Madd Style Cosmetix delivery yet????

Soooo thats the long and the short of it. I dont even know what that means. Well, just go to the links above and check out all the awesome stuff that is being sold where 100% of the proceeds are going to this noble cause!!!! Please help us in the fight against cancer for our wonderful friend Kim!!!! Thanks guys!!

Wait...here are the links again JUST IN CASE!!!
May funding update: http://glitter-bitches.blogspot.com/2011/05/were-almost-half-way-there.htmlDonate
stuff: http://glitter-bitches.blogspot.com/p/handmade-donations.html
Donate cash http://glitter-bitches.blogspot.com/ - link on the "DONATE" ribbon under the glitterometer
Glitter Bitches Facebook page http://www.facebook.com/gbhandmade
Kim's Art Page: http://antfarmstudio.artfire.com/


xoxoxoxoxo

Saturday, May 14, 2011

My first Youtube Tutorial!!

Youtube!!!

Thats right people, scary but true. I discovered (duh) that my camera had like 8 minutes of video time on it and I could if I hustled, do a short tutorial! I even got the hang of the editor program I had pretty quick! Hope you enjoy, sub to my channel if you like :) xoxoxoxo

Tuesday, May 10, 2011

Happy 1st Birthday to Madd Style Cosmetix annnnd I'm one of the new Madd Models!!! :D

A VERY Happy 1st Birthday to Madd Style Cosmetix!! Also I've been chosen as one of the new Madd Models!!

I'm over the moon to say the least! First off, what a thrill to help celebrate MSC's first anniversary of being in business!!!!!! To celebrate, Mo is having ridiculous sales on her product which include TONS of new GORGEOUS highly pigmented mineral VEGAN eye shadows!!! I recommend you go RIGHT NOW and check out her etsy store: http://www.etsy.com/shop/moloverox  ALSO there's a fab new logo for MSC which is so rockin' it will make your eyes bleed!!!!!! Well, not really...but its pretty rockin'!  (it's above the title!!) Ugh I'm in love!!!

Now for the really super big news (yes I'm a selfish whore LOL)! I've been added onto the team by Mo as one of the new Madd Models AKA The Madd Cats!!!! This gives me tons of street cred natch, so I now walk around with my pimp hat tilted way low. I'm in seriously talented company if you haven't seen the other Madd Cats work...go to Mo's fanpage for MSC and check it out (including my awesome face which has awesome MSC makeup on it and my awesome bio. Its all pretty awesome.) Here's the MSC fanpage, and more importantly...my bio: My Super Awesome Bio in MSC's Madd Model's Album While you re on that album, please scroll thru to see the other beautiful people who are models as well! It makes me so proud to know that Mo and the other Madd Cats who helped her decide feel my work is good enough to be counted among their own!

In honor of MSC's 1st Birthday I rocked an old school look and honored the anniversary by wearing one of the first gorgeous piggies I ever bought...and coincidentally enough the first piggie that I ever fell in love with on MSC's page. I believe it was the lovely Krissi Sandvik (check out her youtube: http://www.youtube.com/krissisandvik ) who was rocking the purple "Pixie" and it was just love at first sight! (With Krissi and "Pixie"!)
 Inner Corner/Duct - "Ice Cream Daydream" blended to "Radar Love" on the Lid. Outer Corner - "Pixie" blended up onto the orbital bone and in crease. "Ice Cream Daydream" used as a highlight on the brow bone as well, blended down lightly to smooth out the edge of "Pixie". I would have loved to have gone bolder with the color, but it was also Mother's Day and I didn't want to go too nuts (like I usually do!).


Oh hello. I didn't see you standing there as I pose in front of this window with my lips slightly parted...


Thanks for checkin out the pics, I am working on lots of good stuff...including more tutorials. As a teaser, I plan on doing a tut involving priming your eye before putting on your makeup. Of all the questions I get asked its always about how to get your color to really stay on for a long time and to get the pigments to be bold and bright and really POP! Wait for it. Its all coming! Know what else I have coming? More MSC pigments...so I'll certainly be playing with that!

Oh and also, I realized that my camera of course has a video function and I can record about 8 minutes onto it...soooo guess who will be working on her first youtube tutorial? (I'll post it here too!) I'm pretty darn psyched. Below I will post the links to all the other super amazing Madd Models! Check them out!! (thanks to Tiffany Aull (http://mrsaull923.blogspot.com/) for the links below, I kinda swiped them from your awesome blog. Go see Tiffany's blog!!

Thanks for hanging out, check out MSC's new stuff, you'll thank me later!
xoxoxoxo

Amanda - Youtube - Blog - Twitter

Ana - Youtube

ArJay - Youtube - Blog - Facebook


Chrissy - Blog

Danielle H - Youtube

Danielle J - Blog

Eige - Blog

John - Youtube

Krissi - Youtube - Facebook

Nikki - Youtube

Sarah - Youtube - Facebook

Wednesday, May 4, 2011

On-The-Go Neutrals! Quick and easy Tutorial

You're the Inspirationnnnnnnnnn....

OK so this morning, I have to attend my son's Mother's Day Tea Party at his pre-school! I'm super excited because there is supposed to be food and tea (natch), plus the kids have been working on a surprise for the Moms. I was in the shower considering what colors to wear and what outfits I have on hand. I don't know about you guys, but sometimes finding inspiration for makeup is a little difficult.

I figured today, aside from the tutorial on applying my neutral look, I'd share with you where my color inspiration comes from. I generally like to match my eye makeup/lip color with whatever I'm wearing. I knew I'd be wearing a tan/camel colored shirt and jeans...so time to dig through my Madd Style Cosmetix collection to find my tan/brown neutrals.


First, I choose the color I want to work around. It doesn't have to be the lightest or darkest color...it can just be the color you most want to wear. I REALLY wanted to try out my newest MSC shade, "Secret Sinner". This color is a glitzy neutral with pink undertones and tons of red glitter. Here's a pic of this gorgeous shade plus a swatch on my arm. By the way, a swatch is basically just a swipe of the color on a part of your body to show the true color.

Now to find a color that will be complementary to Secret Sinner. I want to go for something neutral with a bit of pink undertone.  I swatched a few other colors just to see and saw that they didn't really match "Secret Sinner". Ideally, since "Secret Sinner" has that neutral shade, pink undertone and red glitter...any shade that has those aspects in it would go great.  I decided to swatch "Desert Punk" next to "Secret Sinner" to see if it goes well. Since "Desert Punk is a pinky neutral, it was a natural choice.
Here's the picture of "Secret Sinner" & "Desert Punk" swatched next to each other. I gotta admit, "Desert Punk" is one of my favorites for it's versatility. Its pink, grey, neutral, brown...just gorgeous and goes with many other colors.
Just from looking at the two swatches (the pic is kinda crap, sorry for that!) I can see that I'd like to use "Desert Punk" on the inner corner/duct and then "Secret Sinner" on the middle of the lid...and do a progression of color from light to dark. Now...that brings me to the next question. What color to use for the dark neutral? This will be creating the shadow on the outer corner so it should compliment the other shades but be bold.


Hmm...rifling thru my little black bag full of MSC goodness....AH!


Oh sure... "Bon Bon Blitz" MSC's  brand new dark brown with golden glitter!! I defy you to use this color and not sing "Ballroom Blitz" like I was the entire time.  This color is GORGEOUS! I am a bit skeptical because "Secret Sinner" & "Desert Punk" don't really have any gold in them. Howeverrrrr if I use "Thunder Snow" as a highlight...that has plenty of gold in it and would tie it all together!


YES! As you can see from the swatches on my arm, the colors look like they will go GREAT together! I have all the shades I need to complete my look, and...


 EGADS checking my watch I only have 20 minutes to slap my makeup on and leave to go to this Mother's Day Tea thing. EEK!


Time to start out the way we usually do...prep the eye with Urban Decay Primer Potion (UDPP). Let it dry for a good 5-10 minutes! This will allow your makeup to stay on for hours and hours. Next up is NYX Jumbo Eye Pencil in "Milk". Just a dot in the center of the lid and blend out. Even coverage, but not too thick. The white color on the lid preps it so the minerals stick to the lid, plus make the color POP! Apologies for my furry eyebrows.


Grabbing my small shadow brush, I go straight for the "Desert Punk". I'm using it as a highlight in the Duct and then blending out a bit towards the inner corner. I basically wanted to blend it out to the first 1/3rd of the lid. Remember to tap the color onto the lid. Brushing will make a lot of the glitter come off. If the color isn't bold enough for you, go right ahead and keep layering the color.


Next up is "Secret Sinner". Using your medium sized eyeshadow brush load up on "Secret Sinner" and pat in a line down the center of your lid right next to "Desert Punk". So far we've covered 2/3rds of the lid...the last part is for "Bon Bon Blitz so don't stray too far over towards your outer corner. Pat Pat Pat the color on!


For the shadow effect in the outer corner, we are using our darkest neutral tone, "Bon Bon Blitz". I have my crease brush here patting the color into the outer corner. Without going back for more color, just start sweeping your brush with "Bon Bon Blitz" across your eyelid towards your inner corner, over the orbital bone. Don't go up too high...leave about a brush length for the highlight.


So far, here's where we should be at. A gradual darkening of color culminating at the outer corner and blending up over all the colors creating a shadowy look in the hollow of your eye.


Highlight time! Using your fluffy eyeshadow brush...get "Thunder Snow" and start sweeping it across your brow bone. Blendy time! Soften the edge of "Bon Bon Blitz" and bring the color all the way across under your eyebrow. Ooooo sparkly! Add your favorite mascara, I added a black eyeliner to the top line and bottom waterline. Not too dramatic because it IS 11 AM. And guess what? We're DONE!


WOW That whole thing took me about 15 minutes to complete which leaves me with 5 minutes to spare!! ....which is a good thing because Zachy has a poopie diaper BLECH! He always knows when I'm about to walk out the door!


The finished product! I really love that this color combo can be used everyday, for work, for a Mother's Day Tea Party etc. It matches my shirt awesomely too. Pictures below for your enjoyment. Please ignore my eyebrows with the stray hairs all over the place. Time for a waxin'.


Remember to take wet napkin or something and clean up the glitter fall-out that can happen around the bottom of your eye and cheeks. Its a small price to pay for working with such GLITTERY makeup!!


Hey you can see my shirt in this one! My eye makeup matches nice, right?!  


Thanks for checking the tutorial out! This just shows that you CAN do awesome makeup in about 15-20 minutes! I even went thru the tutorial quick! Ah, on the lips I just used a neutral light brown with some gold sparkle. Nothing too heavy or dark on the lips unless you want to use this for a night look. Then, I could totally see this with a darker brown lip and some gold gloss on top. Gotta have that bling! Any questions please post below!!
xoxoxoxoxoxoxo

Monday, May 2, 2011

NYX Eyebrow Cake Powder - Review/Tutorial (Re/Tut? LOL)

The Quest for The Holy Grail A.K.A.: The search for the perfect eyeshadow kit!

Hey all! Well, I'm on my constant quest to find the best thing for my hot-mess eyebrows. I never thought I'd get to this point in my life where I needed to ADD to my eyebrows, as for years before I was always looking to subtract subtract subtract! I was blessed with very thick bushy eyebrows...think Burt from Burt and Ernie on Sesame Street. I never had a uni-brow but I definitely had some thick ass brows. My Godmother used to tell people her niece looked like Brooke Shields when I was a kid. But alas, those were the heyday of my brows. Ever since I had my second son my eyebrows (along with the rest of my body) have just about given up.


Well lookee what I found....


 Here is a picture of me around age 16...I was taking my senior class picture. Ohhh what a fun time the mid-90's were. Toast of New York (Cover Girl I believe) lip color...what a mistake that was. Just because everyone was wearing it did NOT mean an orangey brown was right for me!! GAH! And those brows. What a spectacle. This is how I walked around until I think my best friend Lisa Anne told me in college: "Dude get those things WAXED!!"  And the spiral perm. Oh the spiral perm. This was also just about before the time where I decided since I was a social outcast at my all- girls Catholic High School (oh yes) that I should look the part and started wearing black lipstick and purple hair. But I digress...hey, at least I was skinny.


Time to come back from my follicly-challenged past... 


 So I find myself looking for the perfect eyebrow kit. I have used eyebrow pencils in the past, but found them to be a bit harsh. I really don't need to LINE my brows, just fill in a bit. The NYX Eyebrow Cake Powder in Blonde 06 seemed to fit the bill. I think really, I may need a lighter shade...when my brows are all filled in they seem a bit dark.


Overall the product is GREAT for the price. it comes with two different shades of pressed brow powder in an adorable little compact. It's tiny, maybe 3"X 2" tops. It also comes with wax for those fly-away brow hairs, and two brushes. One brush is for literally brushing your brow hairs into place, and the other is a stubby, stiff angled brush for applying the color/wax. Regular price for this compact at Ulta is $5.99 and it was BOGO for NYX (at Ulta I think it ALWAYS is!) and I paid about $3!

Here's the compact closed. It has a neat, hinged clear cover that flips sideways to the right. I haven't had an issue with it flipping open on its own, but then again I don't really take it out with me. Once my brows are done, they are done and I leave the kit at home.


And here's the compact open. I've used this quite a bit so yes those are hairs in the wax. Before you have a hairy canary, its not MY hair...what do I look like a collie? Its the little hairs from the brush that comes with the kit. Not the best quality brush, so I left them on the wax for effect to show you all. Also because I'm a slob.


Let's start playing with this kit shall we?

Guess what we start with? That's right two jacked-up, clean eyebrows that probably are overdue for a waxing.

Oh good, I just happen to have a pair!


 Here's a closeup of my eyebrow. The hairs are just all over the place. It looks like I slept on my face. You can see here that towards my nose the thickest part is definitely spotty looking, it needs some filling in. The arch needs some direction and purpose instead of looking like its wandering all over my face. The ends need to be filled in a lot because the two or three hairs hanging out there don't really count as an "eyebrow" at this point.


As a fun little aside, my old boss that I used to have when I worked at L'Oreal/Lancome corporate was super awesome, and she happened to be from Moscow, Russia. She lived there til she was like 25 (she was 32 when I met her) so she spoke perfect English, but occasionally had trouble with American slang/colloquialisms. (which we NEVER made fun of her for. Not! She loved it tho and always laughed at herself. I love that chick!) Anyhoo...she told me how when she first came to America she didnt get the word eyebrows too well and had called them "eyebrowsers". I still laugh out loud thinking about "eyebrowsers". I imagine a google search type browser but made completely of eyebrows.


Back to business!


Grab the brush from the kit (it looks like a mascara wand!) and start taming those wild brows. I start closest to my nose and brush upwards, following the direction the hairs grow in. I then go along the arch and out towards my temple. Just like brushing your hair, go IN the direction of the hair..not against it or you'll look like a Wookie.


Ahhh there, all the hair going in somewhat the same direction. Success!


Time to start filling in. Use the angled brush to get color loaded on there. I like to mix the two colors because I found the dark to be too dark and the light to be too faint. I take a bit up onto the brush and then tap it into the empty area (where the brushes usually hang out) and just tap off the excess/mix the colors.


As a rule of thumb, I like to follow the above "guidelines" when filling in my eyebrows. I like to make sure the arch is in line with the end of my nose. I also like to make sure the end of my eyebrow doesn't go beyond the end of my eye. A good way to figure all this out is to use an eyebrow brush and do some measuring. Nobody wants to walk around rocking too-long eyebrows.


I bring the brush up and start towards my nose. With gentle brushing strokes I fill in all the empty spaces. The goal is to give the eyebrows some shape and not go too nuts. It should all look pretty natural. Brush in the direction the hair is growing in and refill your brush if you run out of color.


Getting towards the outer tip,  you can see I turn the brush to get the edge on the part of the eyebrow that gets thinnest, the ends. Follow the natural arch of your eyebrow and don't go too far above or below it, or else the result will be way too dramatic. Unless that's what you're going for of course. If that's the case then brush away my friend!


This step isn't completely necessary if you feel like your brows are all going in one direction and are still not too messy. This is the wax step. I put a bit of wax (a little goes a long way!) on the brush and brush again in the direction of hair growth.


Here is the end result;  a perfectly shaped, filled in eyebrow with all the hair going in one direction! Sort of. I definitely need a wax/trim. Eventually my eyebrows get too long and nothing short of crazy glue will keep them all going in one nice neat direction. But you get the point.


BEFORE AND AFTER! 


As you can see from the first picture my eyebrows were sparse and had no direction. In the second pic they definitely look shaped and well behaved. And I had my bluetooth in my ear the entire time. Classy. FYI the lip gloss I'm wearing is LORAC 3D Multiplex in 3D which is super awesome. I plan on doing a review of their lip gloss soon so there's a little teaser.


So here's a fun fact...I can do this trick with my eyebrows and raise them one by one...left...right. Good thing I have nice, filled in eyebrows so I can really draw attention to my silly face.
 I know you're impressed. I am too.


So thanks for following along on my Re/Tut. I hope it was entertaining and informative. I will post a little more information below on NYX's Eyeshadow Cake Powder if you're interested in purchasing. I think if you need to give your brows a little boost it's worth it. I give the product overall a A-.  Why not an A? Well, I think this is their lightest shade and I really feel like I need a lighter color. Oh well. Follow my blog for more fun stuff happening soon!
xoxoxo


 INGREDIENTS: Powder – Kaolin, Talc, Nylon-12, Zinc Oxide (CI77497), Pentaerythrityl Tetraisostearate, Bis-Digylceryl Polyacyladipade-2, Isostearyl Isostearate, Octyldodecyl Stearoyl Stearate, Diissostearyl Malate, Ethylhexyl Palmitate, Phenyl Trimethicone, Dimethicone, Tocopheryl Acetate, Isopropylparaben, Isobutylparaben, Butylparaben, Methylparaben, Propylparaben, Mica (CI77019). MAY CONTAIN: Titanium Dioxide (CI77891), Iron Oxide Red (CI77491), Iron Oxide Black (CI77499), Iron Oxide Yellow (CI77492), Carbon Black (CI77266). Gel – Bees Wax, Copernicia Cerifera (Carnauba)wax, Euphorbia Cerifera (Candelilla)wax, Polyethylene, Polybutene, Ricinus Communs Seed Oil, Helianthus Annuus(Sunflower)Seed oil, PVP/Hexadecene Copolymer, Bis-Digylceryl Polyacyladipade-2, Tocopheryl Acetate, B.H.A.

NYX is cruelty free, but not  entirely Vegan so check the ingredients!! This product is also Hypoallergenic.