Total Pageviews

Showing posts with label eye makeup. Show all posts

Saturday, June 18, 2011

Madd Style Cosmetix - Frozen Treat Tutorial!

I scream, you scream....


Not that I EVER need a reason to eat ice cream, but there is just something about summertime that makes ice cream alllll the more delicious!

We Madd Models of Madd Style Cosmetix  have been commissioned to do "Frozen Treats" for the month of June. I had considered a few options, but I really wanted to do some kind of ice cream because well, I loooove me some ice cream! In Martinsville, NJ near where I live there is a super-sweet mom and pop owned restaurant/ice cream parlor called Gabriel's Fountain. Hubby discovered it on his way home from work one day and we have been going there for YEARS! I dragged myself there pregnant with BOTH of my boys and now we go as a family as well. Its an awesome family oriented place and the ice cream is TO DIE FOR (all made on the premises!)


So Gabriel's Fountain has a flavor of ice cream called "Black Raspberry Truffle" (yes, that's it in the above pic!!!) and its my most favoritest yummiest ice cream like ever. Its a Black Raspberry ice cream with teeeeeeny little dark chocolate truffles that when you bite into them are filled with Black Raspberry Jam. I told you it was TO DIE FOR!!!


Here is my bestie Lisa Anne eating a cone of Black Raspberry Truffle the size of Wisconsin. In her defense....she was pregnant so its perfectly ok that she was trying to eat her weight in Black Raspberry Truffle ice cream. Incidentally, her and I were due last year on the same EXACT date. Pretty sweet to be miserable alongside your best friend in the whole universe. (Long story short, I gave birth a month early because I suck. Lisa Anne is my son's Godmother and her daughter is already betrothed to my son.) But I digress....whenever I go to Gabriel's and get ice cream, Lisa Anne calls me all kinds of awful names.

...Until I show up on her doorstep with a quart of Black Raspberry Truffle.


So yes, this is my inspiration! Mo makes such gorgeous purples how could I not use one for this tutorial? So lets get moving. Here's what you need.


Madd Style Cosmetix! (Left to right, top to bottom:) Bon Bon Blitz - a gorgeous brown with gold glitter, Spooky Girl - Black with silver glitter, Bubble Gum Crisis - a metallic dusty pink that's borderline lavendar, Sugar Plum - a plum purple with pink undertones, XRay Spex - a neutral white with pink duo chrome.

Brushes of course:


Time to Prime with our Urban Decay Primer Potion and NYX Jumbo Eye Pencil in "Milk".


Eep almost forgot, we must have Awesomesauce!!!! I really want my colors to POP and by applying the TINIEST bit of Awesomesauce to your lids (and giving it some sufficient drying time) it will magnify the colors!! I have found that a little bit goes a loooong way with this, so a helpful trick is take the tiniest drop and put it on your pinkie. Rub your pinkies together and apply a thin coating to your lids. I give it a few minutes and a little fanning to help get it drier and a bit tacky.


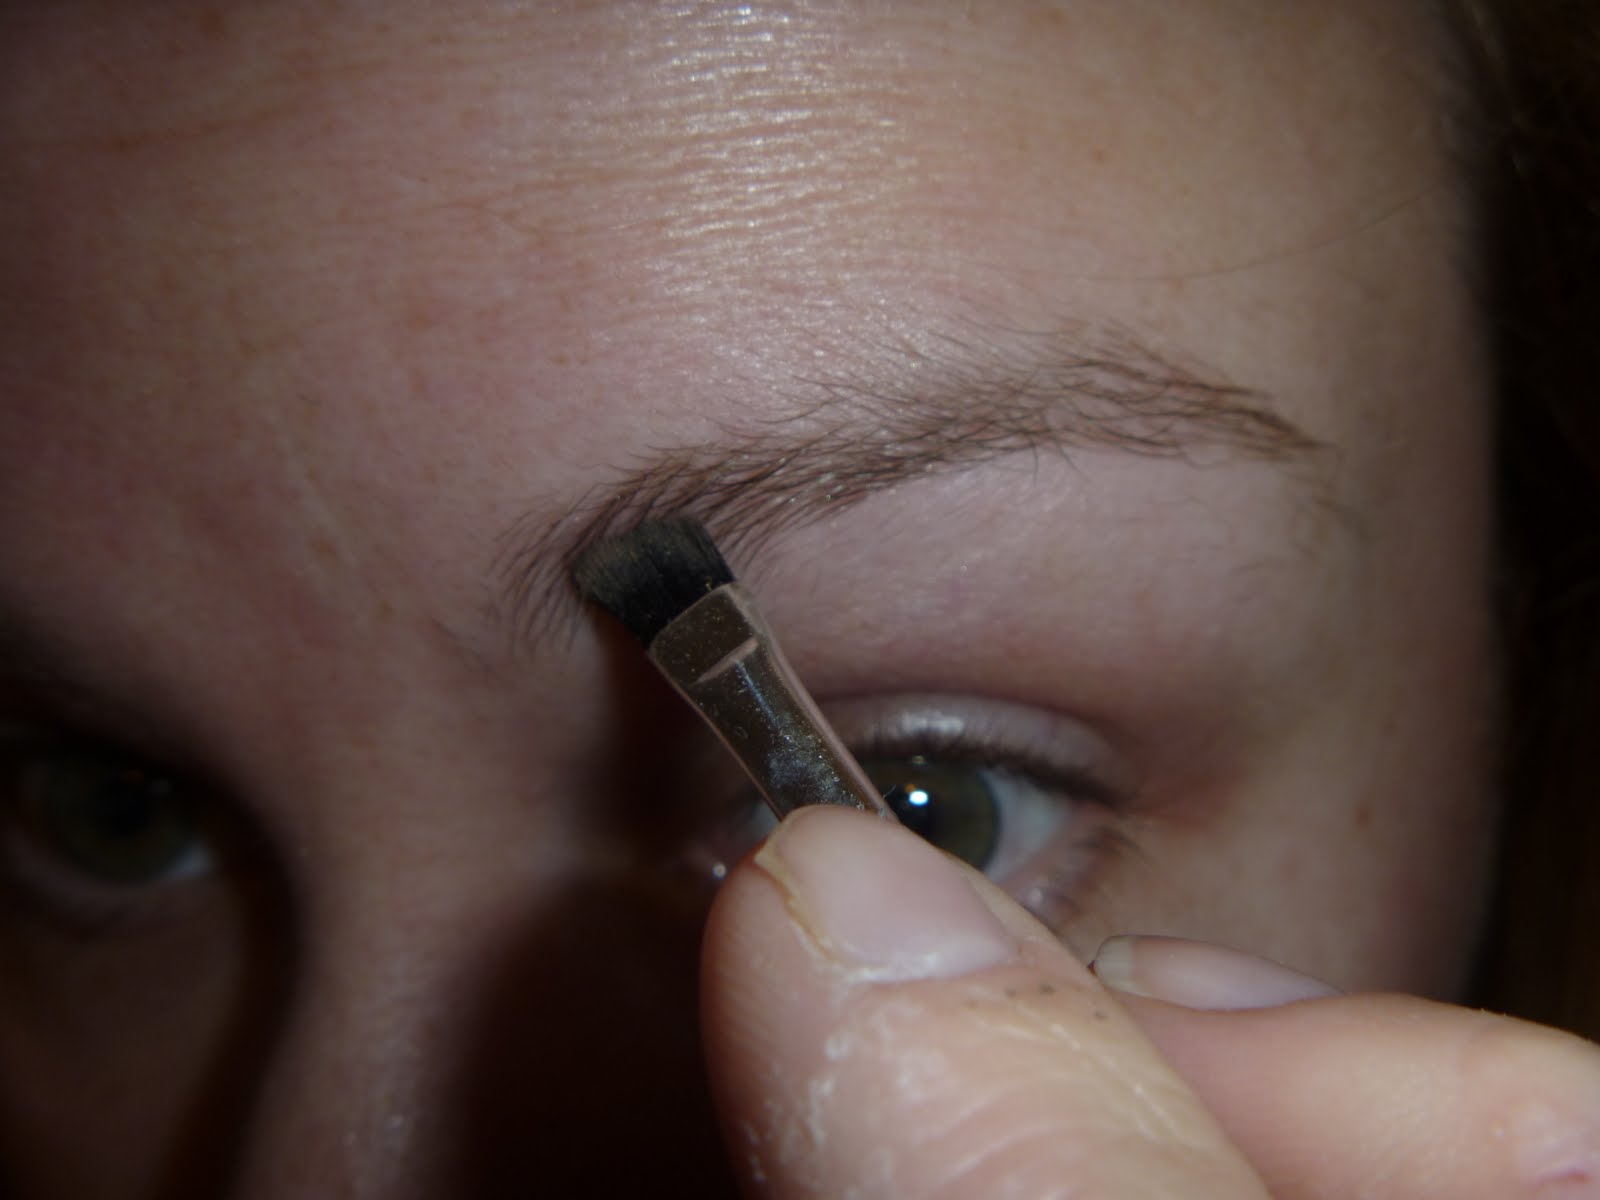
OK lovelies, are we all primed, based, Awesomesauced and ready to rock? Good. First thing we need is our smallest eyeshadow brush to get into our duct area. What's going there? I'm glad you asked. XRay Spex of course!

Try not to go too far into the inner corner with the Xray Spex, we are just using it as a small highlight...a place to pick up the light. Duh, highLIGHT.


Next up, grab another small, short bristled eyeshadow brush and load it up with Bubble Gum Crisis. We are basically going to from lightest color to darkest to get that sweet color-progression. Since Black Raspberry Truffle is a light purple color, this will help achieve the look. Apply Bubble Gum Crisis just after Xray Spex, near the inner corner and blending out just slightly.  Remember to PAT the color on! Whenever you sweep the brush you knock off glitter and also the precious pigmented minerals that you WANT to stick to your eyes! Patting is a great gentle way for you to almost PUSH the color onto your eye to really make it pop. Also, because Bubble Gum Crisis is a pretty light color, don't be afraid to layer the colors up to get it to the desired shade. You really don't want to go much further than the center of the lid. Let's save that real estate for something else.


OK here comes some Sugar Plum! Use your medium sized shadow brush and grab that sweet sweet purpley Sugar Plum! I'm using this on the last third of the eyelid towards the outer corner, but juuuuust leaving enough space for more good goodness on the outside. Once you've patted the color on, sweep your brush ever so slightly (without picking up more pigment....just using whats already on the brush) into the crease. This will drag some of the Sugar Plum up and over your eyelid ever so slightly.


Now here comes the fun mixy part that I was waiting for. To achieve the dark chocolate look we want, let's blend two colors together. I know, it sounds crazy but hang with me a sec. You'll see! Take your crease brush and get some Bon Bon Blitz on there. Next, get your spooky girl and tap out just a little into the cap.  Without knocking any Bon Bon Blitz off your brush, start tapping into the Spooky Girl on the cap and swirl the two colors together. You want to create the dark chocolate color by combining the two, and there is no perfect science to it. If you re concerned its too light or too dark for you...make a small swatch on the inside of your arm.  It should look like my brush above. Not too brown, not too black.  Once you're happy with the new color we've created (Spooky Bon Bon?) tap that color into the outer corner of your eye.


Using the crease brush and without getting more pigment, drag the brush across the orbital bone just above where the Sugar Plum was blended into the crease. This is going to create a layered color look. The point is to have the outer corner the darkest point and have the color taper off and get lighter as it reaches your inner corner.


At this point, let's evaluate what our eyelid situation is. We may need to reapply some colors if they have been covered over somewhat in all the blending and adding we've done. Re-apply some of that Xray Spex like I am in the picture. Also, get more of your Bubble Gum Crisis and punch it up just a little patting and blending all the way.


Blendyyyyy!!!!! Get your big, fat, naked blendy brush (that means no color on it!) and start blending the top line out. Small circles help soften the line of Spooky Bon Bon, and brush upwards to help soften.


So, at this point this is what you should have! To finish this look off, I had a super cool idea!


Grab a liquid liner eyeliner pen. I'm using E.L.F. in Coffee. It's cheap, (Target for $1. That's right, $1) easy to use and the coverage is pretty darn decent! (Take note of my super sweet nailposish btw...Sally Hansen HD in "Laser" FTW!!!) For those of you who are eyeliner freaked out...practice really does make perfect. I can tell you that if you start from the middle of your eyelid and work your way out in short connecting lines (almost like you re brushing it on in small strokes) you can get a straighter line rather than if you just drag the pen/pencil along in one fell swoop. Once you get to the outer corner, return back to the center of your eyelid and go backwards towards your tear duct in small lines.

Let's pull a little magic out of our asses now. While the liner is still relatively "wet" grab your thinnest, smallest bristle eyeshadow brush or a smudger as it's called in my Ecotools set. Get some Bon Bon Blitz ONLY (no Spooky Girl this time....sorry Spooky Girl!) and do this:


TAP the Bon Bon Blitz onto the semi-wet liquid eyeliner and it will STICK!!!! Now check out the redonk line we made! It's all sparkly and looks very much like chocolate. Then again, since Ive been dieting, many things look like chocolate to me.


To finish the look off, you can use a pencil liner on the waterline...I used a black pencil. If this creeps you out you don't HAVE to do this, but you can take Bon Bon Blitz on the smudger brush one more time and pat some onto the waterline over the pencil. I also smudged it down into the lash line a little bit as well to create a semi-smokey look.


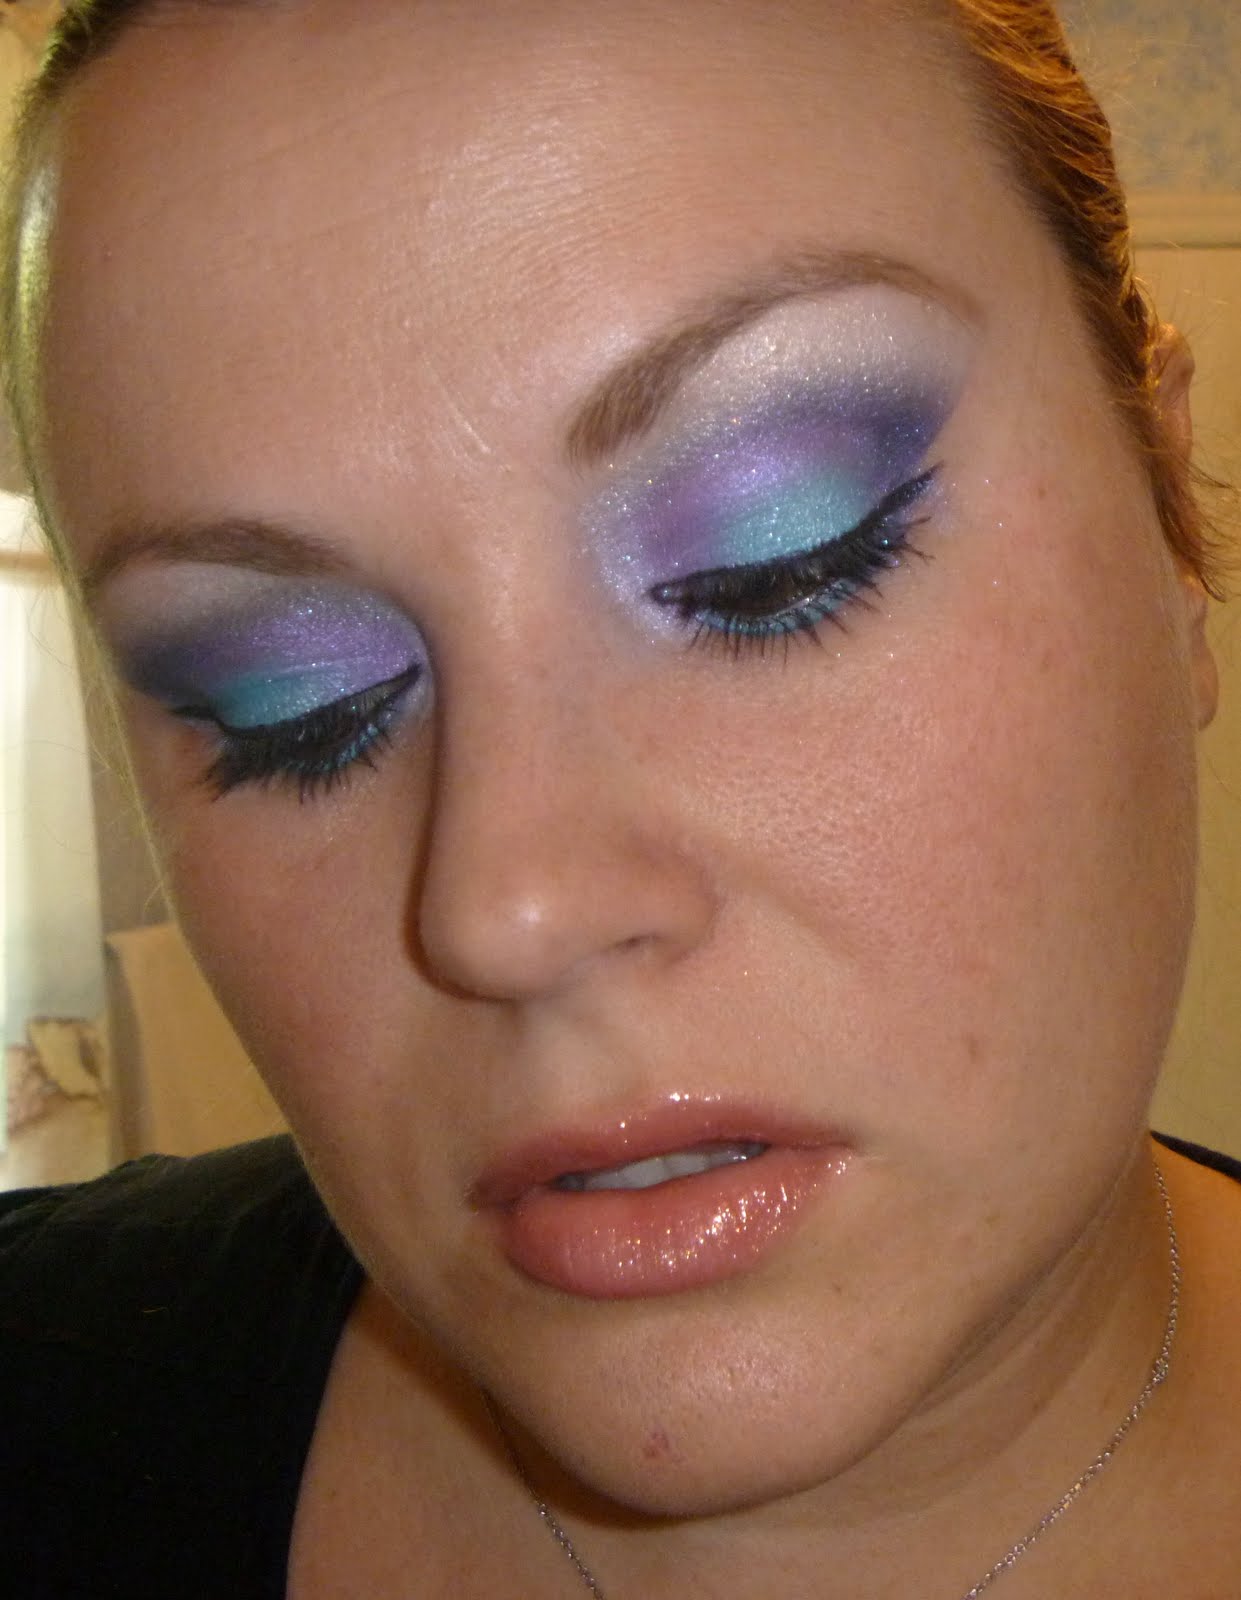
A little mascara and BOOM! We're done!!!!! I REALLY loved this look if I do say so myself! I hope its a fitting tribute to such a delicious ice cream!  As always, super awesome pictures of the finished product!!!


Hope you liked this tutorial! Let me know in the comments if you like, it's great for stroking my already enormous ego!

I MUST give a shout-out to Gabriel's Fountain of Martinsville, NJ. If you live in the area GO and have a lovely lunch or dinner there. The place is so adorable like a cottage and of course the ICE CREAM is just unreal. They also have tours of the facility so you can see how they make the ice cream by hand!!!  I adore this place, and hey...maybe I'll run into you there!

....just don't tell my BFF Lisa Anne I'm there without her!


Later Lovelies  ~ xoxoxoxo

MADD STYLE COSMETIX HAS MOVED TO ARTFIRE!!!!!!! CHECK OUT THE NEW DROP DEAD FRED COLLECTION!!!

GABRIEL'S FOUNTAIN
1948 Washington Valley Road
 Martinsville, NJ 08836


Monday, May 2, 2011

NYX Eyebrow Cake Powder - Review/Tutorial (Re/Tut? LOL)

The Quest for The Holy Grail A.K.A.: The search for the perfect eyeshadow kit!

Hey all! Well, I'm on my constant quest to find the best thing for my hot-mess eyebrows. I never thought I'd get to this point in my life where I needed to ADD to my eyebrows, as for years before I was always looking to subtract subtract subtract! I was blessed with very thick bushy eyebrows...think Burt from Burt and Ernie on Sesame Street. I never had a uni-brow but I definitely had some thick ass brows. My Godmother used to tell people her niece looked like Brooke Shields when I was a kid. But alas, those were the heyday of my brows. Ever since I had my second son my eyebrows (along with the rest of my body) have just about given up.


Well lookee what I found....


 Here is a picture of me around age 16...I was taking my senior class picture. Ohhh what a fun time the mid-90's were. Toast of New York (Cover Girl I believe) lip color...what a mistake that was. Just because everyone was wearing it did NOT mean an orangey brown was right for me!! GAH! And those brows. What a spectacle. This is how I walked around until I think my best friend Lisa Anne told me in college: "Dude get those things WAXED!!"  And the spiral perm. Oh the spiral perm. This was also just about before the time where I decided since I was a social outcast at my all- girls Catholic High School (oh yes) that I should look the part and started wearing black lipstick and purple hair. But I digress...hey, at least I was skinny.


Time to come back from my follicly-challenged past... 


 So I find myself looking for the perfect eyebrow kit. I have used eyebrow pencils in the past, but found them to be a bit harsh. I really don't need to LINE my brows, just fill in a bit. The NYX Eyebrow Cake Powder in Blonde 06 seemed to fit the bill. I think really, I may need a lighter shade...when my brows are all filled in they seem a bit dark.


Overall the product is GREAT for the price. it comes with two different shades of pressed brow powder in an adorable little compact. It's tiny, maybe 3"X 2" tops. It also comes with wax for those fly-away brow hairs, and two brushes. One brush is for literally brushing your brow hairs into place, and the other is a stubby, stiff angled brush for applying the color/wax. Regular price for this compact at Ulta is $5.99 and it was BOGO for NYX (at Ulta I think it ALWAYS is!) and I paid about $3!

Here's the compact closed. It has a neat, hinged clear cover that flips sideways to the right. I haven't had an issue with it flipping open on its own, but then again I don't really take it out with me. Once my brows are done, they are done and I leave the kit at home.


And here's the compact open. I've used this quite a bit so yes those are hairs in the wax. Before you have a hairy canary, its not MY hair...what do I look like a collie? Its the little hairs from the brush that comes with the kit. Not the best quality brush, so I left them on the wax for effect to show you all. Also because I'm a slob.


Let's start playing with this kit shall we?

Guess what we start with? That's right two jacked-up, clean eyebrows that probably are overdue for a waxing.

Oh good, I just happen to have a pair!


 Here's a closeup of my eyebrow. The hairs are just all over the place. It looks like I slept on my face. You can see here that towards my nose the thickest part is definitely spotty looking, it needs some filling in. The arch needs some direction and purpose instead of looking like its wandering all over my face. The ends need to be filled in a lot because the two or three hairs hanging out there don't really count as an "eyebrow" at this point.


As a fun little aside, my old boss that I used to have when I worked at L'Oreal/Lancome corporate was super awesome, and she happened to be from Moscow, Russia. She lived there til she was like 25 (she was 32 when I met her) so she spoke perfect English, but occasionally had trouble with American slang/colloquialisms. (which we NEVER made fun of her for. Not! She loved it tho and always laughed at herself. I love that chick!) Anyhoo...she told me how when she first came to America she didnt get the word eyebrows too well and had called them "eyebrowsers". I still laugh out loud thinking about "eyebrowsers". I imagine a google search type browser but made completely of eyebrows.


Back to business!


Grab the brush from the kit (it looks like a mascara wand!) and start taming those wild brows. I start closest to my nose and brush upwards, following the direction the hairs grow in. I then go along the arch and out towards my temple. Just like brushing your hair, go IN the direction of the hair..not against it or you'll look like a Wookie.


Ahhh there, all the hair going in somewhat the same direction. Success!


Time to start filling in. Use the angled brush to get color loaded on there. I like to mix the two colors because I found the dark to be too dark and the light to be too faint. I take a bit up onto the brush and then tap it into the empty area (where the brushes usually hang out) and just tap off the excess/mix the colors.


As a rule of thumb, I like to follow the above "guidelines" when filling in my eyebrows. I like to make sure the arch is in line with the end of my nose. I also like to make sure the end of my eyebrow doesn't go beyond the end of my eye. A good way to figure all this out is to use an eyebrow brush and do some measuring. Nobody wants to walk around rocking too-long eyebrows.


I bring the brush up and start towards my nose. With gentle brushing strokes I fill in all the empty spaces. The goal is to give the eyebrows some shape and not go too nuts. It should all look pretty natural. Brush in the direction the hair is growing in and refill your brush if you run out of color.


Getting towards the outer tip,  you can see I turn the brush to get the edge on the part of the eyebrow that gets thinnest, the ends. Follow the natural arch of your eyebrow and don't go too far above or below it, or else the result will be way too dramatic. Unless that's what you're going for of course. If that's the case then brush away my friend!


This step isn't completely necessary if you feel like your brows are all going in one direction and are still not too messy. This is the wax step. I put a bit of wax (a little goes a long way!) on the brush and brush again in the direction of hair growth.


Here is the end result;  a perfectly shaped, filled in eyebrow with all the hair going in one direction! Sort of. I definitely need a wax/trim. Eventually my eyebrows get too long and nothing short of crazy glue will keep them all going in one nice neat direction. But you get the point.


BEFORE AND AFTER! 


As you can see from the first picture my eyebrows were sparse and had no direction. In the second pic they definitely look shaped and well behaved. And I had my bluetooth in my ear the entire time. Classy. FYI the lip gloss I'm wearing is LORAC 3D Multiplex in 3D which is super awesome. I plan on doing a review of their lip gloss soon so there's a little teaser.


So here's a fun fact...I can do this trick with my eyebrows and raise them one by one...left...right. Good thing I have nice, filled in eyebrows so I can really draw attention to my silly face.
 I know you're impressed. I am too.


So thanks for following along on my Re/Tut. I hope it was entertaining and informative. I will post a little more information below on NYX's Eyeshadow Cake Powder if you're interested in purchasing. I think if you need to give your brows a little boost it's worth it. I give the product overall a A-.  Why not an A? Well, I think this is their lightest shade and I really feel like I need a lighter color. Oh well. Follow my blog for more fun stuff happening soon!
xoxoxo


 INGREDIENTS: Powder – Kaolin, Talc, Nylon-12, Zinc Oxide (CI77497), Pentaerythrityl Tetraisostearate, Bis-Digylceryl Polyacyladipade-2, Isostearyl Isostearate, Octyldodecyl Stearoyl Stearate, Diissostearyl Malate, Ethylhexyl Palmitate, Phenyl Trimethicone, Dimethicone, Tocopheryl Acetate, Isopropylparaben, Isobutylparaben, Butylparaben, Methylparaben, Propylparaben, Mica (CI77019). MAY CONTAIN: Titanium Dioxide (CI77891), Iron Oxide Red (CI77491), Iron Oxide Black (CI77499), Iron Oxide Yellow (CI77492), Carbon Black (CI77266). Gel – Bees Wax, Copernicia Cerifera (Carnauba)wax, Euphorbia Cerifera (Candelilla)wax, Polyethylene, Polybutene, Ricinus Communs Seed Oil, Helianthus Annuus(Sunflower)Seed oil, PVP/Hexadecene Copolymer, Bis-Digylceryl Polyacyladipade-2, Tocopheryl Acetate, B.H.A.

NYX is cruelty free, but not  entirely Vegan so check the ingredients!! This product is also Hypoallergenic.


Saturday, April 30, 2011

1st Tutorial!!!

OK guys so here it is my very first tutorial! I'm excited are you excited? Good. ;) I've got my David Bowie blasting and I'm in the mood to make pwitty eyes. So, here goes!

Tools of the trade:

 On the left: Urban Decay Primer Potion (original color. I refer to it as UDPP). This stuff is like magic! Not necessary for use all the time, BUT if you like your makeup to stay put and LAST this is the stuff you need to put on FIRST. On the right: NYX Jumbo Eye Pencil in color "Milk". But wait you re saying, Chrissy that is NOT a pencil. Good Eye. What gave it away?  LOL  Nope, I depotted it from pencil form. But that's a tutorial for another day. Just know that at one time...it WAS a pencil. ;)


Pretty pigments! All Madd Style Cosmetix of course! Starting at the top pot then left -right : New Piggie "Thunder Snow" (a white with golden glitter), "Glitter & Doom" (a dark purple with tons of rainbow glitter), "Stargazer" (a white with bluish/purple duochrome.), New Piggie "Phantasm" (a beautiful pinkish purple with rainbow glitter),  New Piggie "Kitty Wompous" (a black base with royal purple & royal blue glitter), "Ol' 55" (the perfect aqua color!).


Also you will need some of Madd Style's Awesomesauce. It is a magic liquid that is from the genius mind of Mo, the creator/owner/queen of MSC! Awesomesauce can be used for multiple purposes...as a foiling medium for eye shadow, an adhesive for glitter, a lip plumper (YES!), it does your laundry...well no actually it doesn't do your laundry, I just wish it did. :( But it does a whole hell of a lot of other stuff for a little tube of awesomeness!


Brushes! I always make it a point to have several brushes of varying sizes, fluffiness, usefulness etc. The main brushes I use are a Sonia Kasuk travel size which included a large eye shadow brush, an angled shadow brush, a medium size crease brush, a sponge (which I don't use like evahhh) and a smudger (which I use sometimes). Those are the ones on the left all in white. Good quality brushes considering I paid like $20 for the whole set at Target. Score! The ones on the right are various Avon, Lancome, Bare Minerals brushes I've accumulated. Each one has a purpose and each one will most likely get used.


Tape. Yes tape. Don't ask just yet. Just wait for it. Waaaaait for it.

One very silly nekkid, clean face. I didn't go all out and put on the moisturizer, concealer, powder foundation blah blah blah that I usually do because my focus today will be my eyes. So deal with the greeeeeziness that is my face. I promise to throw on some powder at the end so as not to unnerve anyone. I'll also fill in my eyebrows, because they are all sorts of wrong.


Here comes the good stuff...


Apply UDPP in the center of your eyelid. A little goes a LONG way so don't go overboard or your makeup will clump up/crease.  You want to smudge it and blend it outward to your eye corners and upward until it almost disappears. My advice is wait a good 5 minutes or MORE to make sure its DRY. You don't wait to apply anything on top of tacky/wet UDPP or it will cause your makeup to crease up as well.
Soooo... remember the tape? Bust that out baby! Cut yourself off about 1-2 inches of tape and apply it as I do in the middle picture. You want one end to start at the outer corner of your eyelid and go on an angle up towards where your eyebrows end. I know it doesn't look like it yet, but trust me my eyebrow ends there. ;) Your eye should look like mine in the last picture, UDPP blended out and your tape applied.


Check out the first picture, add some of the NYX Milk Jumbo Eye Pencil in "Milk", applied the same way as the UDPP. Just put a dot of white in the center of your lid and blended it out until it covers the entire lid, crease and upwards toward the brow...blending all the way til its even. Get an angle eyeshadow brush and put some of the NYX "Milk" on the tip (check out in pic 2 my MSC pin in the background which is pinned to my brush case. Shameless plug.).
Brush on  the NYX "Milk" just under your eye. The purpose of adding the white above and below is to help the pigment colors really POP and also to help the pigments/glitter stick to your eye. Again, be SPARING because too much can cause creasing.  Of course once you're done with this part, step back and make a silly face. You've earned it. Egads I look like Joan Rivers on crack.


On to serious business! Grab your small shadow brush and load it up with "Phantasm". Start at the inner corner of your eye and TAP the color on. Because these pigments are so glittery, you want the glitter to stick so tapping is your best bet for the best color/glitter payoff. Keep going back for more pigment if you want bolder color, the best part of the MSC pigments is that they are buildable.
Next, apply "Phantasm" to the outer corner of your eye with the same patting motion. If you end up going up onto the tape that's fine. In fact...do that so you ensure good coverage. Trust me. 
 Lastly, sweep your brush across your lid's natural crease, connecting the inner and outer corner "Phantasm". I like to kind of feel for the natural curve of my eyeball under the lid...it feels a little creepy but its the best way to connect those two color-dots just over your lid.


Once you're done, your eyes should look something like the picture above. The color should look as if it is framing your lid.


Time to fill in that lonely lid. Don't worry lid, you'll be all glittery soon too. Get your large eyeshadow brush and dig into that "Ol' 55". Pat the color on filling in all that empty space. Don't worry if you overlap slightly onto "Phantasm" in the corners. You want to keep "Ol '55" situated on the center of the lid blending out slightly. "Phantasm" should still be visible on the outer corners.


To create an awesome shadow and a little bit of drama to your look, (who doesn't love drama? Well, only if it's on your eyes.) take your crease brush and pick up some "Glitter and Doom". Since "Glitter and Doom" is SO glittery, a brush with shorter, stubbier bristles is always better for holding onto that precious sparkle. PAT onto the outer corner. In fact, it should almost a a pushing motion of the brush...pushing the bristles gently onto the surface of your lid.  You're going to be "Bob Ross-ing" it a bit here....you know, like when you watch Bob Ross paint and he does all that awesome background landscape and then out of nowhere decides to shove a HUGE tree in front of it all?  OK good, I'm glad you're coming along with me on this. :D You're going to slightly be covering up some of that "Phantasm". Don't fret, there will still be blendy goodness showing up so it won't be completely gone.
Without picking up any more new makeup onto the brush, just start blending outwards towards the crease just above "Phantasm". Try to keep the round shape of your blending to match arch of your eyebrow as in the last picture above. Leave yourself about a brush-width of empty space above that. That space is for good goodness to come!


And now the highlight of our tutorial! Ppppbbbttt LAME! :P Wow that was bad. It's actually just time for the highlights. ;) This is really going to draw attention to the high and shallow points of your eye and the light will just bounce right off beautifully. For the browbone, get a fluffy medium shadow brush and dip into your "Thunder Snow". Sweep it just under your eyebrow on the bone focusing in the arch area. Blend blend blend!!! Blend down, around...soften up that line of "Glitter and Doom" a bit. Keep adding "Thunder Snow" because you definitely want the white to show up, and not just have a "Glitter and Doom"/"Thunder Snow" light purple mix. That white should really pop!
For the duct area, grab another small shadow brush and get your "Stargazer". No need to go nuts here, just a little dab or two of "Stargazer" in the duct will really make your eyes stand out.


Uh oh, I need a second. Hold up... 


 Time to feed my son! Sorry kiddo I didn't forget about you!! Mommy just wanted to look super pretty for you while you spit Apricot/Sweet Potatoes at me. :)


OK where was I....oh right.


Using your angled shadow brush, get some "Ol' 55" and make a thin line of color under your eye following the same pattern above. Then, take your "Glitter and Doom" and edge the lower corner of your eye to mirror the upper part. You want your lower lid to resemble your upper color scheme only thinner. I also added some more "Phantasm" to the lower inner corner, to remain consistent.
After your shadows are done and you're pleased with your spectacular work, put on your favorite mascara. I'm using Avon's waterproof Super Full in black. Meh, I used to sell Avon so it's what I got. Aspiring for bigger and better things tho. I prefer Lancome's Hypnose. Totally fab stuff!
OH YEAH and guess what it's time for?? That's right, peel the tape off your face! As you can see in my third picture...it creates a nice crisp line! Pretty neat huh? Thanks Krissi Sandvik for the tip! :D


On to the fun mixy kind of stuff!!!! Get yourself a clean area to mix makeup, like a lid etc. and add a bit of "Kitty Wompous". Add MSC's Awesomesauce...only a drop is needed!! It goes a LONG way! Take your super thin liner brush and mix mix mix! The consistency should be thin but not too watery. Load up your liner brush and start in the center of your lid. There is no need to draw one looooong line of liner on. In fact, you will get better coverage and make less mistakes if you do short strokes out towards the outer corner of your eye. I added a neato little wing..You can if you want too.Up to you. Once you get to the outer corner of your eye, go back to the center (re-load up your brush if needed) and using the short strokes go backwards from the center of your eye towards your duct.
To complete the look, I use a basic black pencil liner (the kind I used was an Avon black pencil liner) to fill in the lower waterline (the inner part of your lower lashline). You can see the completed look below with the lower black line filled in. 


And now please enjoy some gratuitous shots of me modeling my sweet makeup job thanks to Madd Style Cosmetix!


It's MEEEEE!!! See, I promised I'd fill in my eyebrows! I used NYX powder eyebrow kit in Blonde 06 (a review on that to come!) and Stila's Lip Glaze Stick in Grapefruit. This was taken in sunlight.
Boy, do I look PISSED!  Nahhhh... I just make that serious face so my eyes won't crinkle if I smile! If I was ever that serious I think I'd have to kill myself. ;)


The finished product! Taken indoors with camera flash. In this one you can really see "Stargazer" in the duct! I chose it because it has that blue duochrome, which I think fits really well with the "Ol' 55" and the other color choices too.


Another indoor shot with flash. "Kitty Wompous" is SOOO KILLER as a liner! It's just so darn sparkly!

Indoor pic with flash of mah whole face, so you can get an idea of the color placement.


Annnnnd one more crazy closeup in natural sunlight no flash. Woo hoo!
Thanks for checking this out and feel free to comment any questions. Feedback is welcomed as well!  Much love!!! xoxoxoxo